


Mercedes W166 X166 Digital Cluster Installation (2012–2019): How Is It Done in 21 Real Steps?

Mercedes W166 X166 Digital Cluster Installation · 2012–2019
How does Mercedes W166 X166 digital cluster installation actually work?
Mercedes W166 X166 digital cluster installation is more involved than removing an analogue cluster and plugging in a replacement screen. In the documented installation route, the original instrument cluster is removed from the dashboard, opened on the workbench, and the required original instrument hardware is transferred into the replacement LCD cluster housing. The matched adapter wiring is then connected, the assembly is reinstalled, and vehicle information must be checked before the dashboard is considered finished.
Direct installation answer: the 21-step route is: remove dashboard trim → remove the factory cluster → disconnect it → open the original instrument → prepare the replacement LCD housing → transfer the required original instrument hardware → secure it → connect the matched adapter harness → reinstall the cluster and trim → power the system → verify vehicle information before normal use.
Important boundary: this guide does not automatically include the Mercedes GLE Coupe C292/W292 or a vehicle whose original cluster housing, connector or dashboard structure differs from the reference shown here.
Supported Vehicle Routes
Which models and years can follow this Mercedes W166 X166 digital cluster installation reference?
W166 and X166 cover several Mercedes SUV naming periods. That makes a single marketplace label such as “ML GL GLE GLS 2012–2019” too broad for choosing a product. The installation family may be related, but the correct cluster and supplied interface route still need to follow the actual model and year.
Use the earlier W166 M-Class product route. Do not order from the later GLE page solely because the dashboard appears similar.
Use the pre-GLS X166 route. The GL and later GLS names should not be treated as one universal product listing.
This is the facelift W166 SUV route marketed as the GLE.
The facelift X166 should follow its own GLS product route rather than automatically using the earlier GL configuration.
Why model year alone is not enough
Before shipment or installation, the useful comparison points are the vehicle year, original instrument appearance, dashboard shape, steering position and connector route. If one of those does not correspond with the supplied version, stop before altering the vehicle.
Installation Evidence
What evidence is this Mercedes W166 X166 digital cluster installation tutorial based on?
This tutorial follows a documented 21-step W166/X166 instrument-cluster installation sequence. The photographs show the physical route from the original dashboard and instrument removal through original-hardware transfer, adapter connection and final dashboard reassembly.
The images are used as installation evidence and procedure reference. They are not presented as an iKAGOO customer case or as proof that every W166/X166-related configuration is identical.
Where the photographs prove a physical action, this guide explains it directly. Where compatibility, optional functions or vehicle configuration can vary, the guide states the boundary rather than turning an assumption into a universal claim.
How the Retrofit Works
Why must original instrument hardware be retained during Mercedes W166 X166 digital cluster installation?
The critical part of this installation is not the dashboard trim removal. It is what happens after the original instrument has been removed.
The documented sequence opens the original cluster and places the required original instrument assembly inside the rear housing of the replacement LCD cluster. In other words, the new digital display is integrated with retained original instrument hardware rather than simply discarding the complete factory unit.
What this means for the installer
Do not treat the replacement cluster as a generic tablet-style screen. Protect the removed factory instrument, keep its screws and components organized, and follow the transfer sequence before reconnecting the vehicle.
What “plug-and-play” does — and does not — mean
A correctly matched route can use vehicle-specific connections without intentionally cutting the supported factory wiring. Plug-and-play does not mean zero disassembly, zero original-part transfer, zero setup or zero function testing.
iKAGOO Installation Decision Metrics
How difficult is Mercedes W166 X166 digital cluster installation?
The currently published GLE W166 2015–2019 product route is classified as an advanced DIY installation because the installer must work with dashboard trim, the original instrument, the matched interface wiring and final function verification.
GLE W166 reference Evaluation standard →
GLE W166 reference Compatibility standard →
Advanced DIY Difficulty standard →
These published numerical scores belong to the GLE W166 2015–2019 product route and should not automatically be copied to every ML, GL or GLS variant.
Preparation Before Disassembly
What should you prepare before Mercedes W166 X166 digital cluster installation?
The easiest installation problems to solve are the ones prevented before the original cluster is removed. Take a few minutes to document the starting condition and organize the work area.
Record model, model year, W166/X166 chassis route, steering position and original cluster appearance.
Take clear photos of the original cluster and surrounding dashboard before dismantling.
Prepare a clean surface for the factory cluster because original instrument hardware will be handled outside the vehicle.
Useful preparation items
- Non-marring interior trim tools.
- The correct driver for the factory fasteners encountered on your vehicle.
- A tray or organizer for the removed screws.
- A clean padded surface for the original instrument cluster.
- A phone or camera for recording connectors and original routing.
- A good light source for inspecting connector seating and wiring.
- The supplied digital cluster, harness and vehicle-specific accessories.
- Your order information if technical support is needed during installation.
Recommended installation habit
Photograph each connector before disconnecting it. If something later appears different from the original state, you have a reference rather than relying on memory.
Phase 1 · Dashboard Access
How do you remove the original cluster for Mercedes W166 X166 digital cluster installation?
Steps 1–7 create access to the instrument assembly and remove it from the dashboard. Work in sequence and avoid pulling the cluster away from the dashboard before the rear connection is accessible.
Document the original dashboard and instrument
Begin with the original cluster fully installed. Photograph its appearance, surrounding trim and initial dashboard condition. Power the vehicle down before proceeding with physical removal.
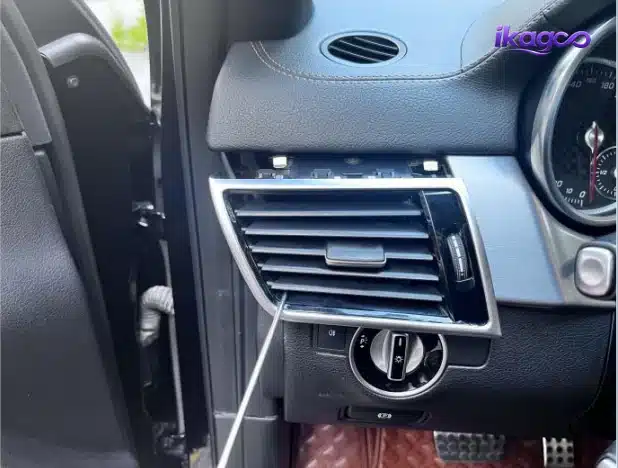
Remove the air-conditioning outlet
Release the air outlet shown in the reference carefully and evenly. Avoid twisting the surrounding trim or pulling from only one point.
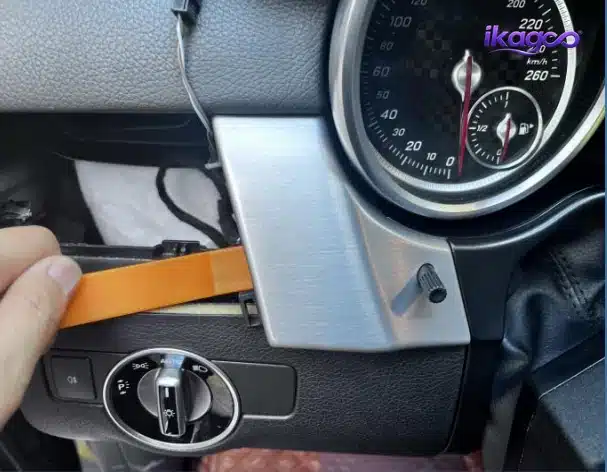
Release the decorative dashboard trim
Carefully remove the trim section required to access the instrument mounting area. Keep the trim on a clean surface so the visible finish is not scratched while the cluster is being worked on.
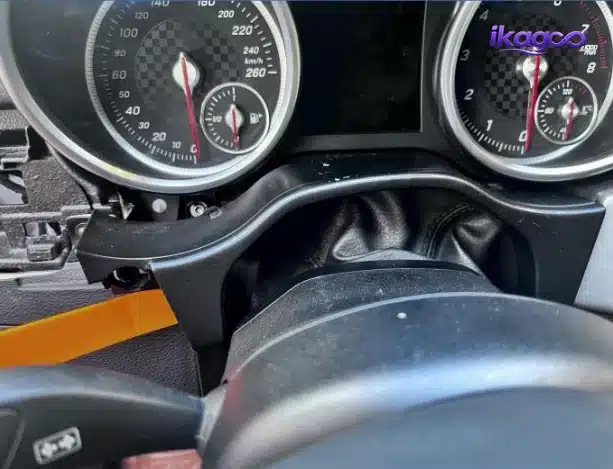
Remove the upper cover above the steering wheel
Release the upper steering-column/cluster cover to create clearance at the lower edge of the factory instrument assembly.
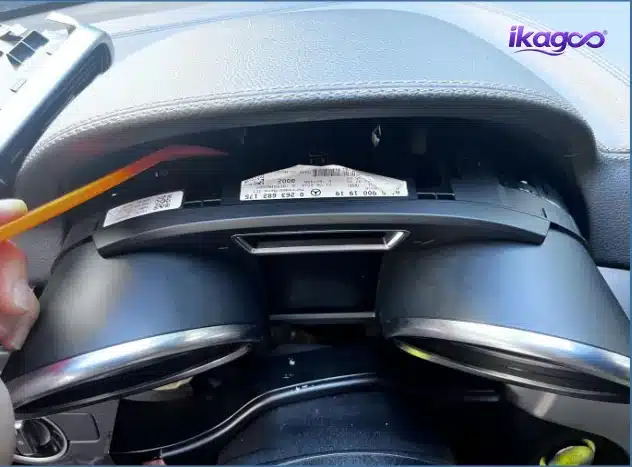
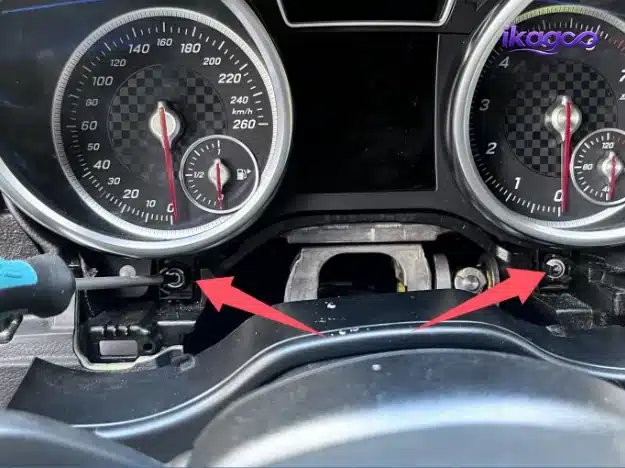
Remove the two instrument-cluster fixing screws
Remove the two fasteners holding the original instrument assembly in the dashboard. Keep them organized because they are reused when the replacement assembly is mounted.
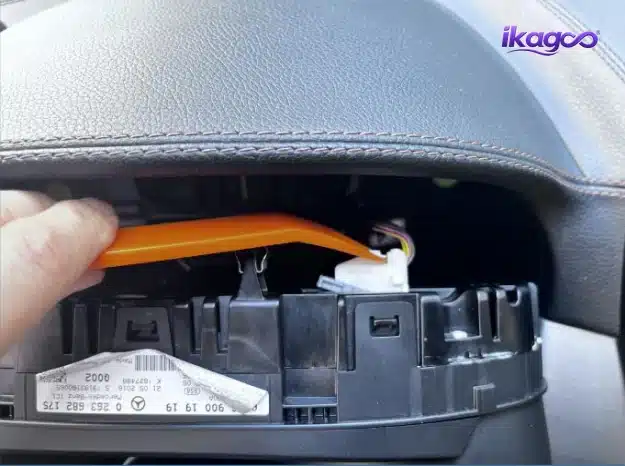
Bring the factory cluster forward
Carefully withdraw the original instrument enough to reach the connection behind it. Do not pull it aggressively because the original connector remains attached.
Stop if the instrument does not release normally after the visible fixing points have been removed.
Disconnect and remove the original instrument
Release the original connector and remove the factory instrument assembly from the vehicle. Inspect the connector and photograph it if you have not already done so.
If the connector or original cluster structure is materially different from the reference, do not cut or repin the vehicle wiring to continue.
Phase 2 · Factory Instrument Transfer
How is original hardware transferred during Mercedes W166 X166 digital cluster installation?
Steps 8–13 are the most technically important part of the tutorial. They show why the factory instrument should be kept protected after removal.
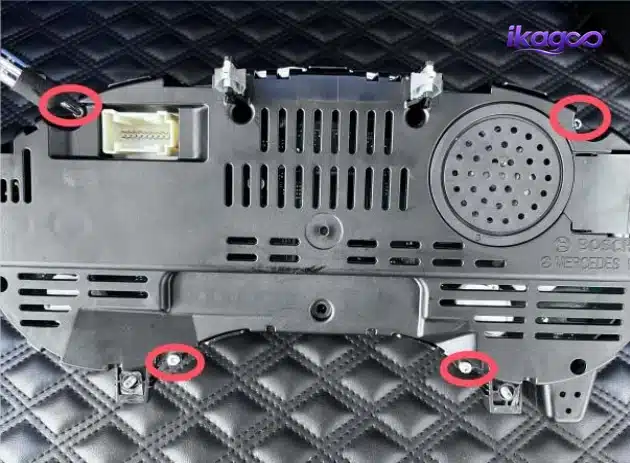
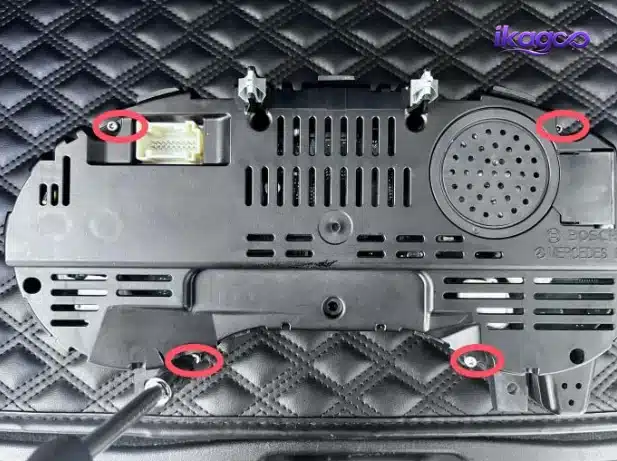
Remove the four screws from the original instrument
Place the original cluster on a clean padded work surface and remove the four housing screws shown in the reference.
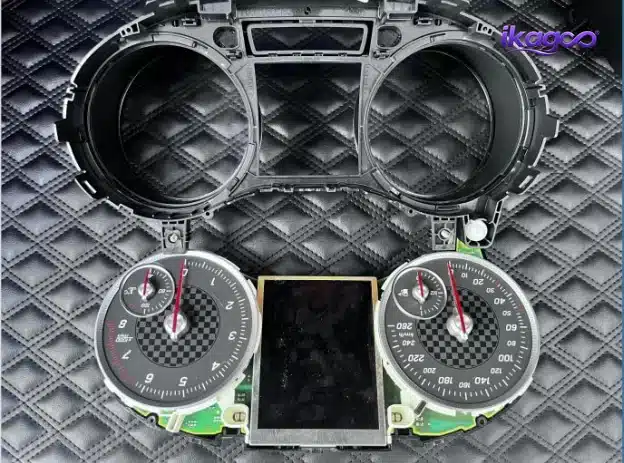
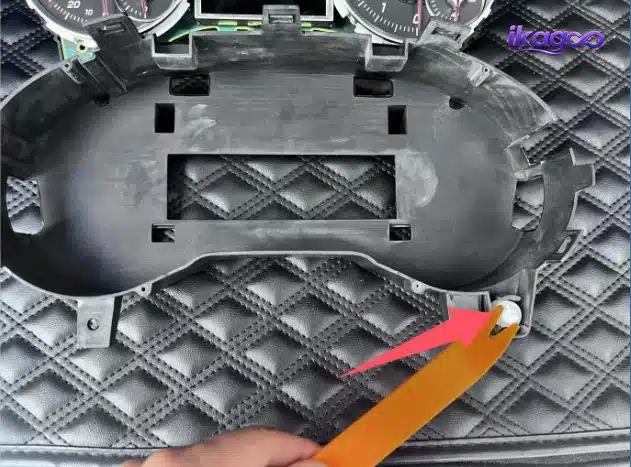
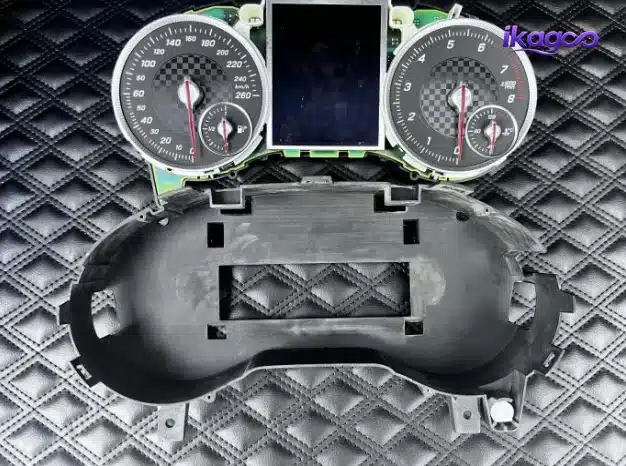
Open the original cluster and remove its mask
Separate the documented housing/mask section carefully. The objective is to gain access to the original instrument hardware that remains part of the completed retrofit.
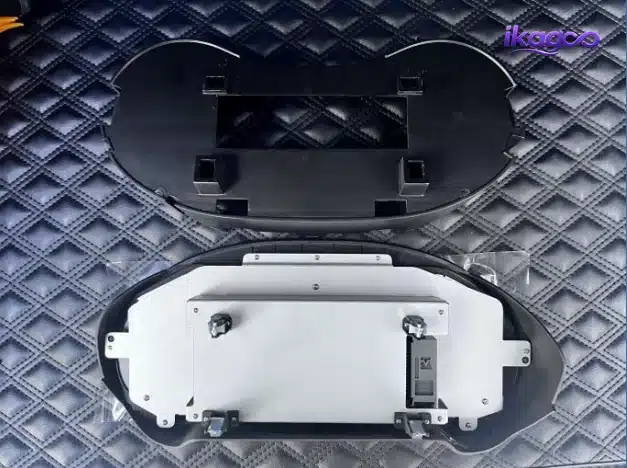
Prepare the new LCD cluster housing
Position the replacement cluster next to the removed original instrument. Before transferring anything, compare the housing and supplied components with the documented route.
Do not alter the original instrument simply to make it fit a visibly different replacement housing.
Install the control button in the new rear housing
Install the white control piece into its shown position in the replacement housing before the original instrument assembly is placed inside.
Transfer the required original instrument assembly
Place the documented factory instrument assembly into the rear housing of the new LCD cluster. This is the central integration step of the retrofit.
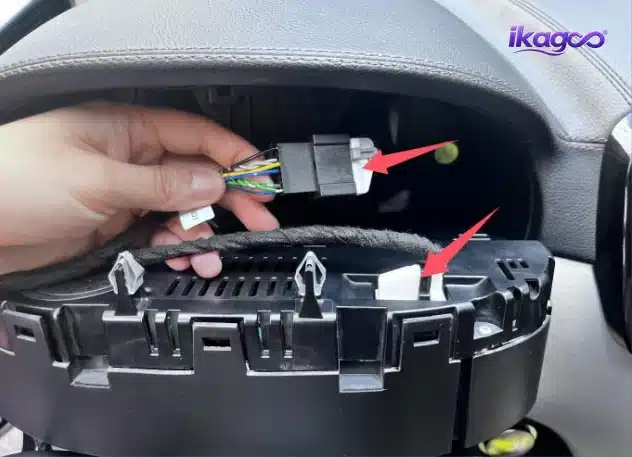
Secure the transferred assembly
Reinstall the documented four screws so the retained factory instrument hardware sits correctly in the replacement cluster housing.
Phase 3 · Wiring & Dashboard Reassembly
How do you connect and reinstall the Mercedes W166 X166 digital cluster?
Once the original hardware transfer is complete, the new assembly returns to the vehicle. The priorities now change from disassembly to clean cable routing, connector matching and final fit.
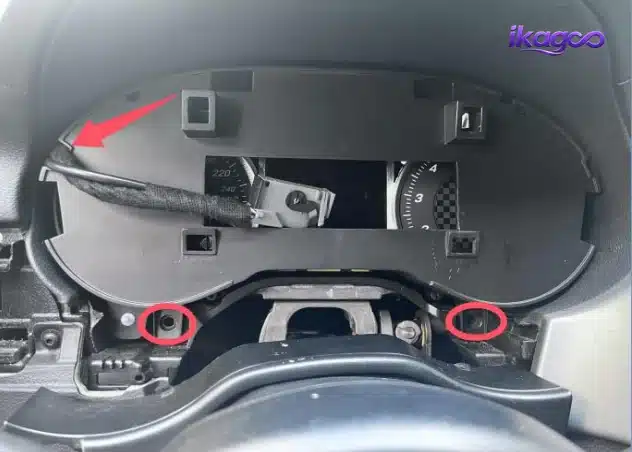
Connect the instrument adapter wiring
Connect the matched adapter harness according to the supplied route. A correctly prepared connector should seat normally without cutting or forcing the supported factory loom.
A connector that cannot be seated normally is a compatibility or routing question, not a reason to modify the car.
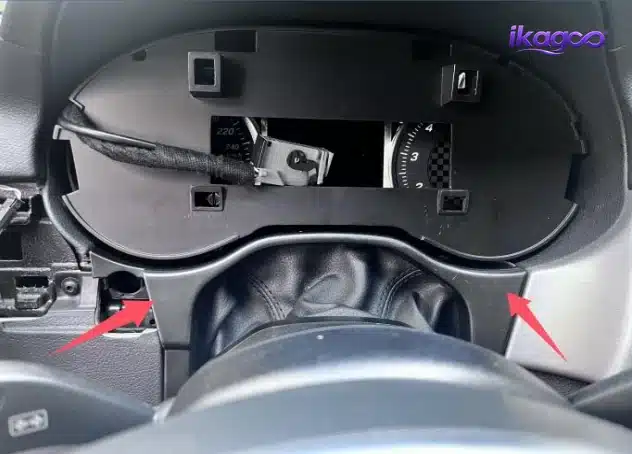
Route the wiring and secure the cluster
Arrange the wiring so that it is not trapped or sharply compressed behind the assembly, then reinstall the two instrument mounting screws.
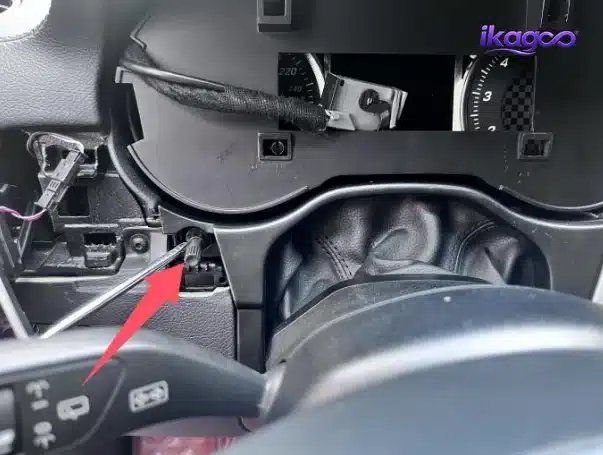
Return the upper steering-column cover
Refit the cover above the steering wheel and confirm its edges sit naturally around the newly installed cluster.
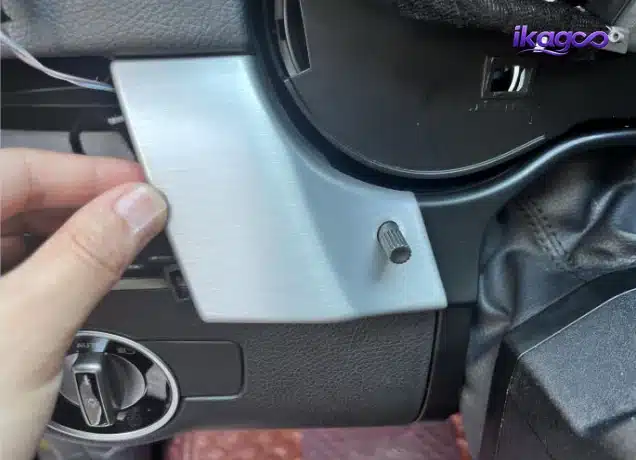
Reinstall the original instrument control
Return the original small control/knob shown in the installation sequence to the completed cluster assembly.
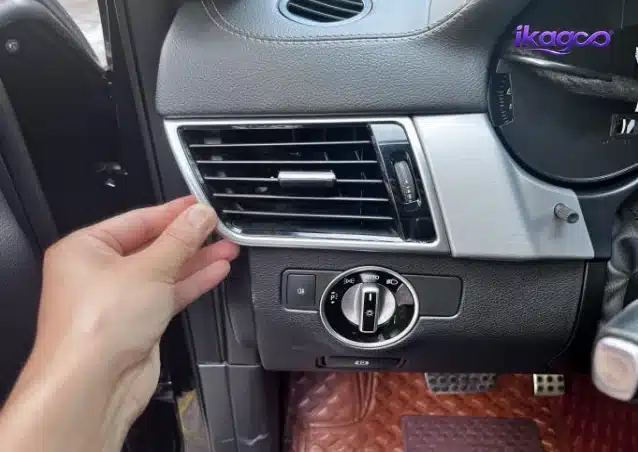
Reinstall the decorative dashboard panel
Align the panel and press it back into its original mounting position. Compare the trim gaps with your pre-installation photos.
Return the air-conditioning outlet
Reinstall the air outlet and verify that its surrounding panel alignment is consistent with the original dashboard.
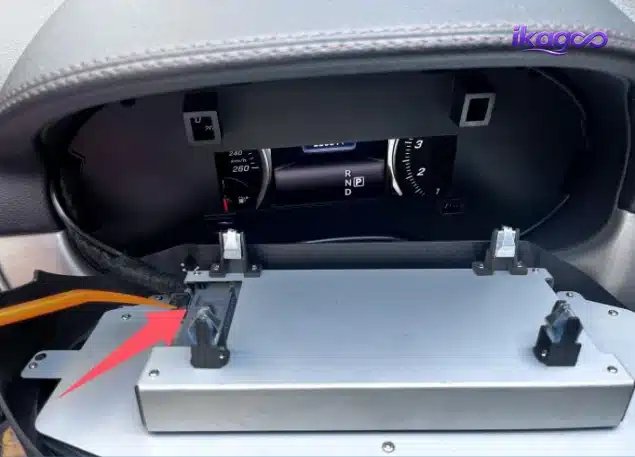
Complete the final documented connection
Complete the connection shown for the matched product route. Connector arrangements can vary between versions, so follow the harness prepared for the confirmed vehicle rather than reproducing another car's wiring by appearance.
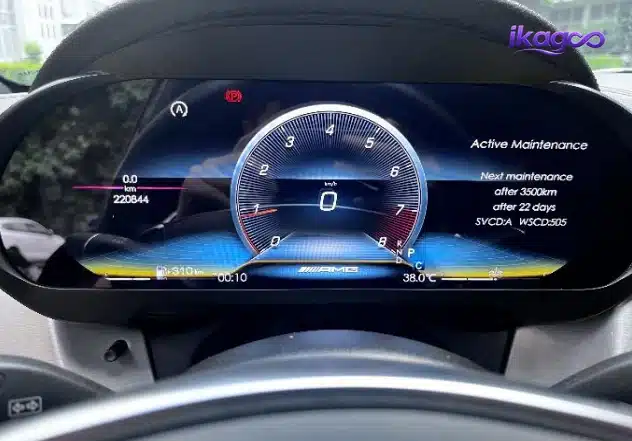
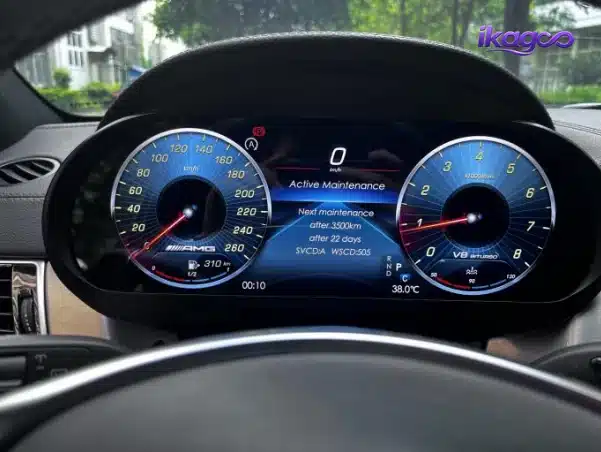
Inspect the completed physical installation
Check the new cluster fit, steering-column cover, decorative trim and air outlet. The display should sit naturally in the factory dashboard area with no visibly forced trim.
First Power-On
What should you do the first time you power on the Mercedes W166 X166 digital cluster?
Do not immediately treat a lit display as a successful installation. The first power-on is the point where physical installation and vehicle communication meet.
Confirm the display powers on normally and does not immediately enter a repeated restart or black-screen cycle.
Check the supported driver information rather than judging success from the graphics alone.
If important vehicle information disappears or a new serious warning appears, stop and diagnose before normal use.
Do not finish the dashboard purely because the screen turns on
First-power-on is an installation checkpoint. If something is wrong, it is easier to inspect connections and routing before every trim piece is considered permanently finished.
Functional Verification
What should you test after Mercedes W166 X166 digital cluster installation?
A digital instrument cluster is part of the driver-information system. The final check should therefore focus first on vehicle information and stable operation, then on any additional functions included with the specific product version.
Optional multimedia, projection, map or other functions are product-version-specific and should be tested only when they are documented for the exact version purchased.
Common Installation Problems
What should you check if Mercedes W166 X166 digital cluster installation does not work correctly?
Troubleshooting should start from the most recent installation changes rather than immediately altering factory wiring or replacing parts.
Re-check the matched harness connection, connector seating and the documented final connection. Compare the wiring with the photographs taken before and during installation.
Check that the original instrument hardware was transferred and secured correctly, then verify the matched interface/CANBUS route for the exact vehicle version.
Stop. Do not cut, repin or force the factory connector simply to make the installation continue. Record the connector and original cluster with clear photos.
Treat this as an unresolved installation or hardware issue rather than normal behavior. Record a video of the startup sequence and the connected harness before further disassembly.
Do not dismiss a new warning simply because the display looks correct. Record the warning, verify the installation connections and obtain technical guidance before normal use if the warning is significant.
Check for trapped wiring, incorrectly seated cluster housing or trim that has not returned to its original mounting position.
Stop Conditions
When should you stop Mercedes W166 X166 digital cluster installation and ask for support?
Continuing by guesswork is more likely to create a second problem than solve the first one. Stop and document the situation when any of the following occurs.
- The original cluster housing is materially different from the reference.
- The supplied connector does not seat normally.
- The required original instrument hardware cannot be transferred as shown.
- The new assembly cannot sit naturally in the factory dashboard opening.
- Important vehicle information disappears after installation.
- A significant new vehicle warning appears.
- The cluster repeatedly restarts or remains black.
- You are considering cutting or repinning factory wiring to continue.
Useful information to send for technical support
Provide the order number, vehicle model and year, steering position, original cluster photo, connector photos, current wiring photos and a short video showing the symptom. This gives technical support evidence to work from instead of a description such as “the cluster does not work.”
Installation Mistakes to Avoid
What are the most common mistakes during Mercedes W166 X166 digital cluster installation?
ML, GL, GLE and GLS naming overlaps across the W166/X166 family. Match model, year and original instrument route.
The documented route clearly includes original instrument disassembly and hardware retention.
A mismatch should trigger a version check, not cutting or repinning of the factory harness.
Test vehicle information and stable operation before declaring the installation complete.
Take photos during disassembly so connector and trim routing can be compared later if needed.
Optional functions vary by exact cluster/product version and should not be inferred from the chassis code alone.
Choose the Correct Vehicle Route
Which product should you use for Mercedes W166 X166 digital cluster installation?
The physical tutorial helps explain the installation family, but product selection should follow the exact Mercedes route rather than a broad “2012–2019” listing.
Use this route for the earlier ML W166 and GL X166 generation.
View ML / GL ClusterUse this route for the facelift W166 GLE SUV.
View GLE W166 ClusterUse the dedicated GLS X166 route for the facelift X166 generation.
View GLS X166 ClusterYou can also browse all Mercedes-Benz Digital Instrument Clusters if you are comparing other Mercedes chassis generations.
For GLE W166 owners still deciding whether the upgrade itself is worthwhile rather than looking for installation instructions, read the separate Mercedes GLE W166 Digital Cluster Upgrade Guide .
Mercedes W166 X166 Digital Cluster Installation FAQ
Frequently asked questions about Mercedes W166 X166 digital cluster installation
What years does Mercedes W166 X166 digital cluster installation cover?
The routes covered here are ML W166 2012–2015, GL X166 2012–2015, GLE W166 SUV 2015–2019 and GLS X166 2016–2019. Product selection still needs to follow the exact vehicle route rather than treating 2012–2019 as one universal part number.
Does the original Mercedes instrument cluster need to be removed?
Yes. The documented 21-step procedure removes the original instrument from the dashboard before the required original instrument hardware is integrated into the replacement LCD assembly.
Do original instrument parts need to be reused?
Yes in the documented route. The original cluster is opened and required factory instrument hardware is retained inside the new LCD cluster housing.
Does Mercedes W166 X166 digital cluster installation require cutting factory wiring?
No intentional cutting of supported factory wiring is part of the correctly matched installation route. If a connector does not fit normally, stop and verify the product/version rather than modifying the vehicle loom.
Is this a true plug-and-play digital cluster?
It can use a matched vehicle-specific connection route, but “plug-and-play” should not be interpreted as zero disassembly. Cluster removal, original-hardware transfer, wiring connection and testing are still required.
Can I install the Mercedes W166/X166 digital cluster myself?
An experienced DIY installer may be able to complete it. The current GLE W166 route is rated Level 3 of 5 — Advanced DIY. If you are not comfortable opening an original instrument cluster, professional installation is the safer choice.
Should I fully reassemble the dashboard before testing?
Complete the physical mounting carefully, but verify stable operation and relevant vehicle information before treating the installation as finished.
Does this guide automatically apply to the GLE Coupe C292/W292?
No. The C292/W292 GLE Coupe is not automatically included simply because it shares the GLE name. Its original cluster and dashboard route should be confirmed separately.
What if the supplied connector looks different from my factory connector?
Stop the installation and document both connectors with clear photos. Do not force, cut or repin the original vehicle connector simply to continue.
What information should I send if the cluster does not work after installation?
Send your order number, vehicle model and year, steering position, original cluster photo, connector/wiring photos and a short video clearly showing the fault.
Does every W166/X166 cluster have exactly the same optional functions?
No. Optional functions are product-version-specific. Do not assume an additional multimedia, projection or display feature solely from the W166/X166 chassis code.
Further Help
Where can you find more help after Mercedes W166 X166 digital cluster installation?
- How to Order — understand ordering and vehicle-version review
- Compatibility & Installation — see what vehicle photos and information are useful
- Installation Guides — browse other verified iKAGOO installation tutorials
- Mercedes-Benz Digital Instrument Clusters — compare other Mercedes routes
- Warranty Policy — check current hardware warranty boundaries
- Is iKAGOO Reliable? — compatibility, order and long-term support process
Mercedes W166 X166 Digital Cluster Installation
Ready to choose the correct cluster for your Mercedes?
Start with the product route matching your actual Mercedes model and year. The installation photos above show why choosing the correct vehicle-specific version matters: the original instrument, replacement housing and supplied interface route all need to work together.
When additional vehicle information is required, use the vehicle year, original cluster photos, dashboard layout and steering position so the appropriate version can be prepared before shipment.








Add comment
You must be logged in to post a comment.