


Mercedes W447 Digital Cluster Installation: 27 Real Steps for 2016–2019 V-Class
Mercedes W447 Digital Cluster Installation Guide: 27 Real Steps for 2016–2019 V-Class
This Mercedes W447 digital cluster installation guide documents a real 27-step retrofit of a 12.3-inch digital instrument cluster in a 2016–2019 Mercedes-Benz V-Class W447.
If you are comparing a Mercedes W447 virtual cockpit, digital dashboard upgrade or instrument cluster replacement before buying, these photographs show what actually has to be removed, how the original instrument assembly is prepared and where the new LCD cluster enters the installation.
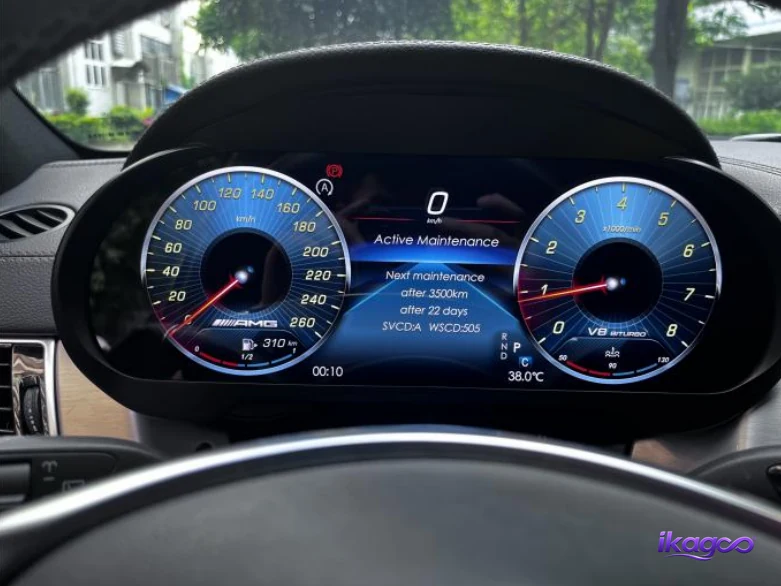
How does a Mercedes W447 digital cluster installation and retrofit work?
A W447 digital cluster retrofit involves more than removing the original gauges and placing a new screen in the opening. On this photographed 2016–2019 V-Class route, access begins around the center display and air vents, continues through dashboard trim and the steering-column cover, and only then reaches the original instrument cluster.
Open the dashboard correctly
The display cover, center screen, vents and surrounding panels are removed in sequence so the instrument-cluster area can be reached without forcing overlapping trim.
Prepare the original cluster
The original cluster is removed and its outer components are separated before the retained original unit is combined with the 12.3-inch LCD assembly.
Connect, install and test
The documented power and adapter connections are completed, the cluster is installed, and supported vehicle information should be checked before all trim is finally closed.
Mercedes W447 digital cluster installation: original dashboard and finished result
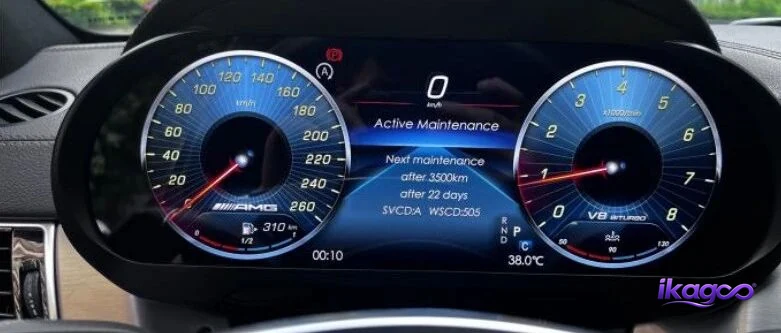
The comparison below shows the starting point and the completed 12.3-inch digital driver display. The main visual change is directly in the driver's information area rather than only on the center infotainment screen.
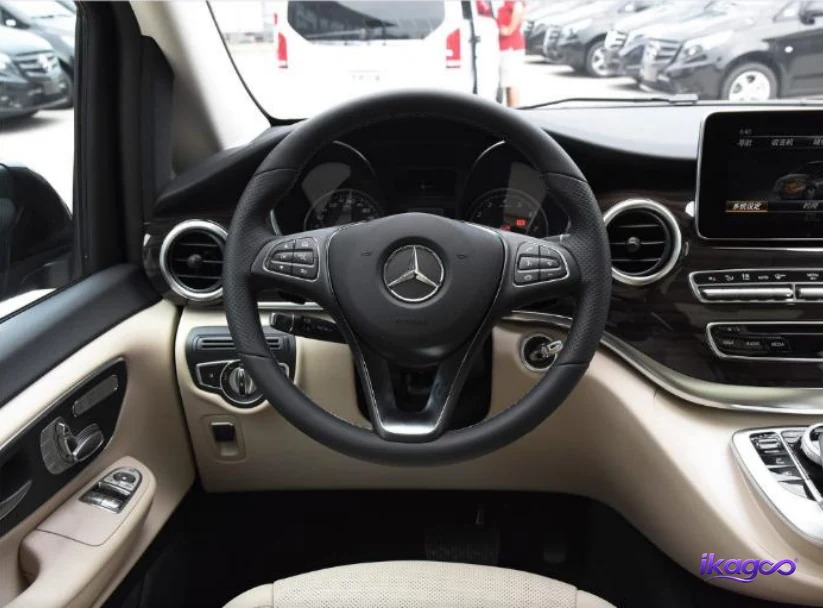
Before the retrofit
The factory dashboard and original instrument display before removal begins.
After the retrofit
The 12.3-inch digital instrument cluster installed and powered in the W447 dashboard.
Which 2016–2019 Mercedes V-Class W447 models are relevant to this digital cluster route?
Mercedes used different V-Class model badges in different markets. Buyers therefore often search by V200d, V220d, V250d, V260, V260L or V300d instead of the W447 chassis code. Final matching should still use the actual model year, dashboard and original instrument cluster rather than the badge alone.
A common European search route is Mercedes V220d digital instrument cluster. The model badge is useful for discovery, but the original cluster and dashboard remain more important for final matching.
The Mercedes V250d W447 digital cluster is another high-intent European and UK search route. Check the actual 2016–2019 configuration before shipment.
These names appear in other W447 markets. A late-2019 vehicle should receive particular attention because configuration changes can occur around model transitions.
Mercedes W447 digital cluster installation: 27 real retrofit steps
Follow the photographed order rather than jumping directly to the original cluster. Several surrounding panels and fasteners overlap the instrument area, so each stage creates access for the next one.
Power off and inspect the original dashboard
Power the vehicle off before beginning and record the original dashboard condition. This gives you a reference for trim gaps, panel alignment and the position of the factory instrument display.
Check whether the dashboard already has aftermarket wiring, damaged trim or previous modifications. Those conditions can change how later steps behave.
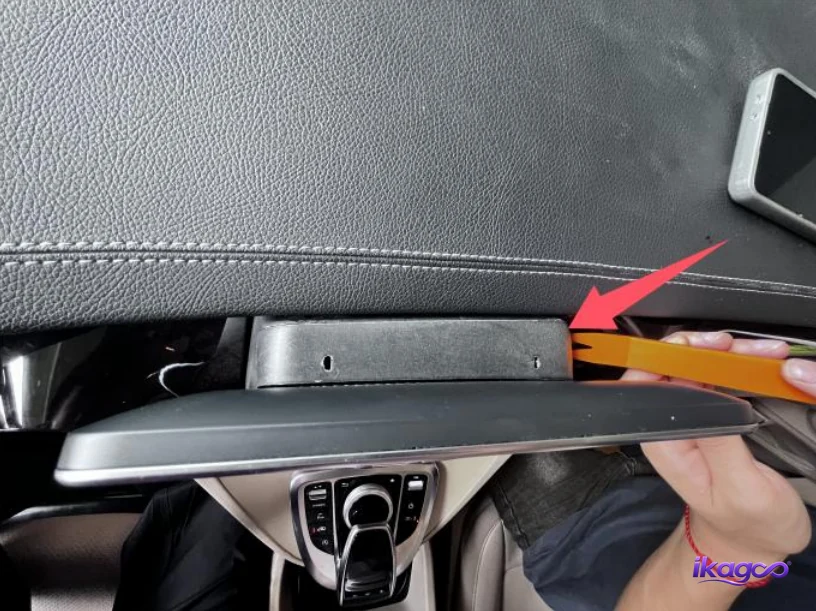
Pry out the screen cover
Insert a non-marring trim tool along the demonstrated upper edge of the screen cover and release the panel gradually. The goal is to expose the screen-area fixing points without concentrating force in one location.
Work along the trim seam rather than bending the cover through its center.
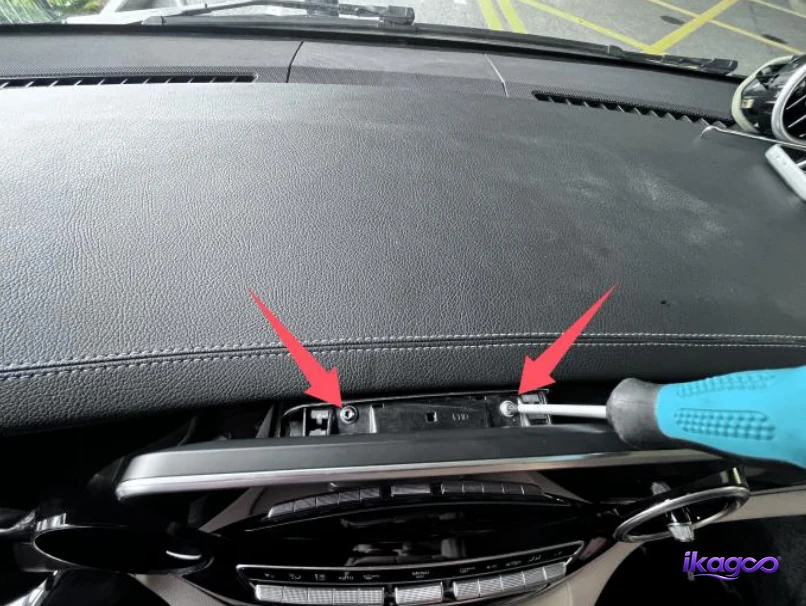
Remove the two screen-area fixing screws
With the screen cover removed, two fixing locations become accessible. Remove both fasteners with the correctly fitting driver and keep them together for reassembly.
Do not begin pulling the original screen until both demonstrated fixing points are free.
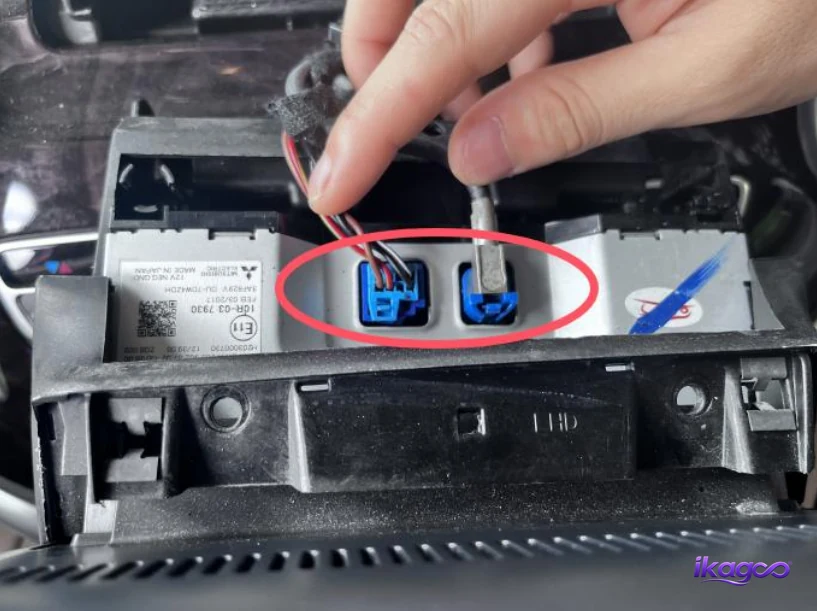
Remove the original center screen
Lift the original display assembly from its mounted position only after the screen-area fasteners have been removed. Support the unit as it comes forward so the rear connection area remains visible.
Do not allow the display to hang from a cable or harness while you continue dismantling the dashboard.
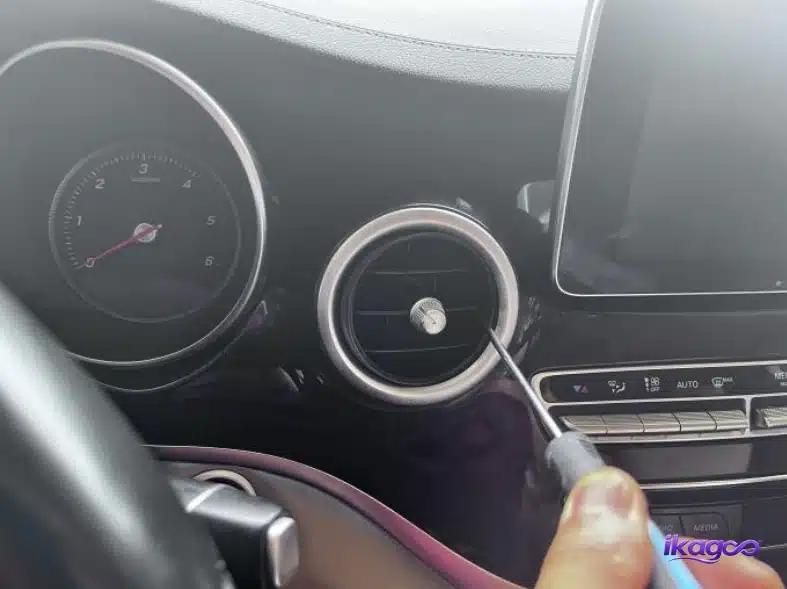
Remove the air vent beside the screen
Release the vent and trim section beside the center-screen area using a plastic pry tool. This exposes another fixing point used by the surrounding dashboard structure.
Release the perimeter progressively so the vent comes out evenly rather than twisting one edge.
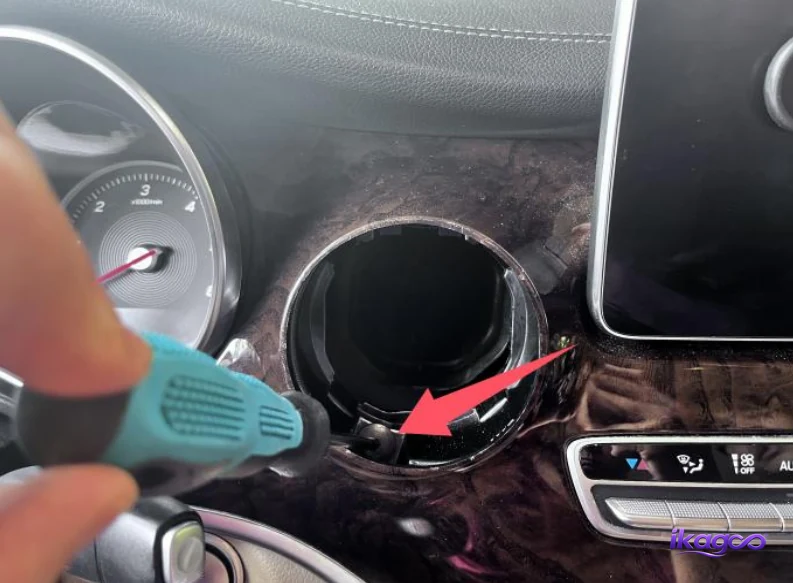
Remove the exposed vent fixing screw
Remove the fastener revealed behind the released vent area. This screw continues to secure dashboard trim that must move before the instrument-cluster opening can be reached.
Store the screw separately from the earlier screen fasteners so each one returns to its original position.
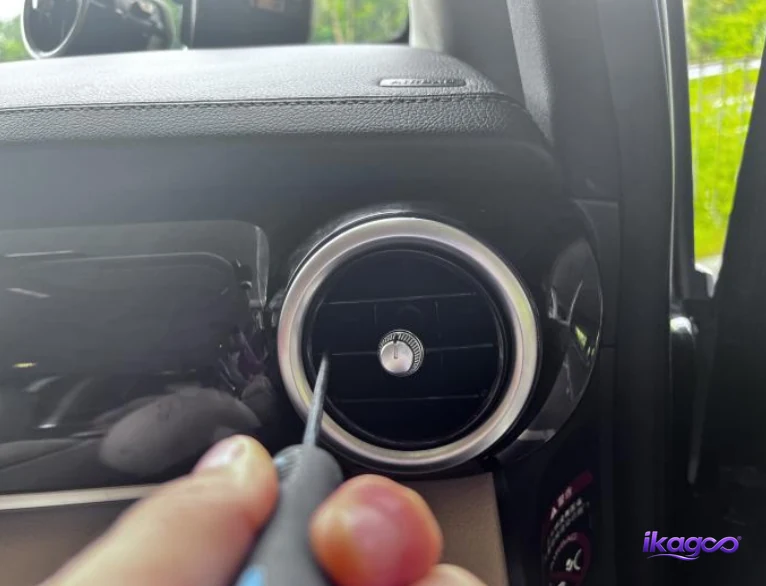
Remove the passenger-side air vent
Release the passenger-side circular air vent to expose the fastener behind it. Work around the vent rather than pulling hard from a single side.
Keep the trim tool against the removable vent edge and protect the surrounding dashboard surface.
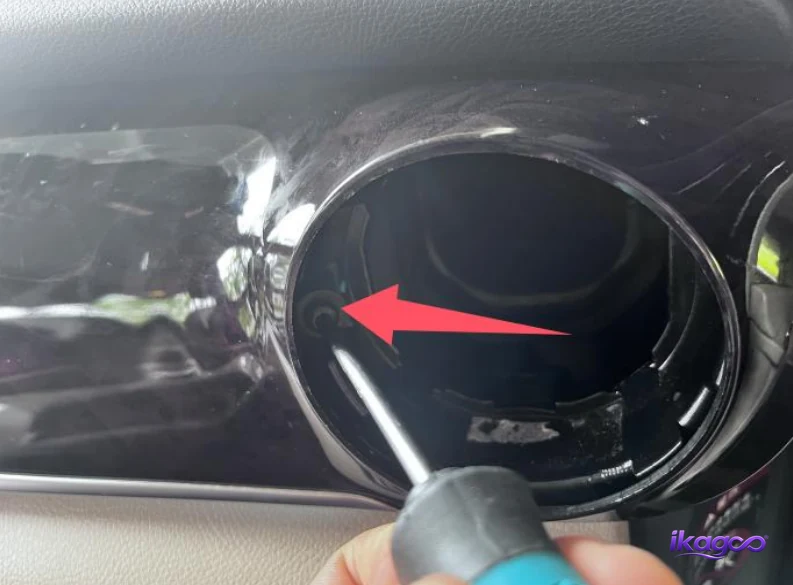
Remove the passenger-side vent screw
Remove the fixing screw exposed inside the passenger-side vent position. Leaving this fastener installed can make the later panel feel stuck and encourages unnecessary pulling force.
Use the correct tool and remove the screw squarely to avoid damaging its head.
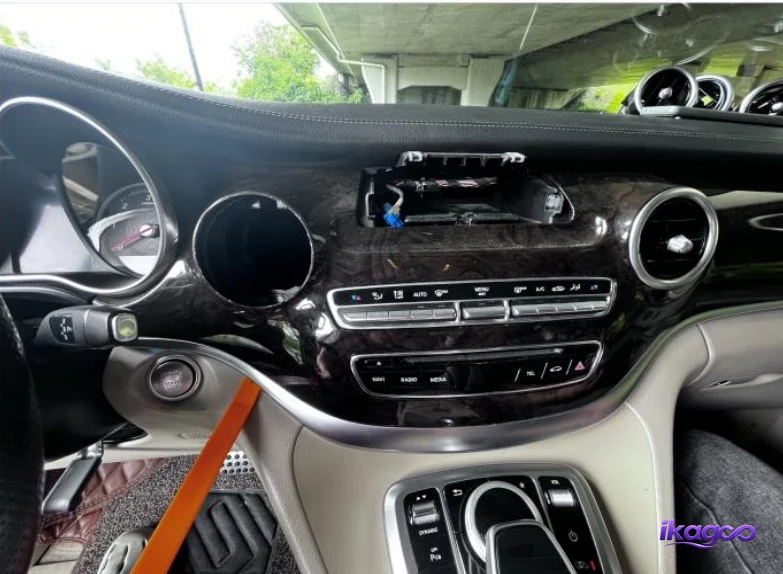
Release the central climate-control panel
Use a non-marring trim tool to release the central dashboard control panel from its opening. Support the panel as it moves forward because a connector remains attached behind it.
Only pull the panel far enough to reach the rear connector comfortably.
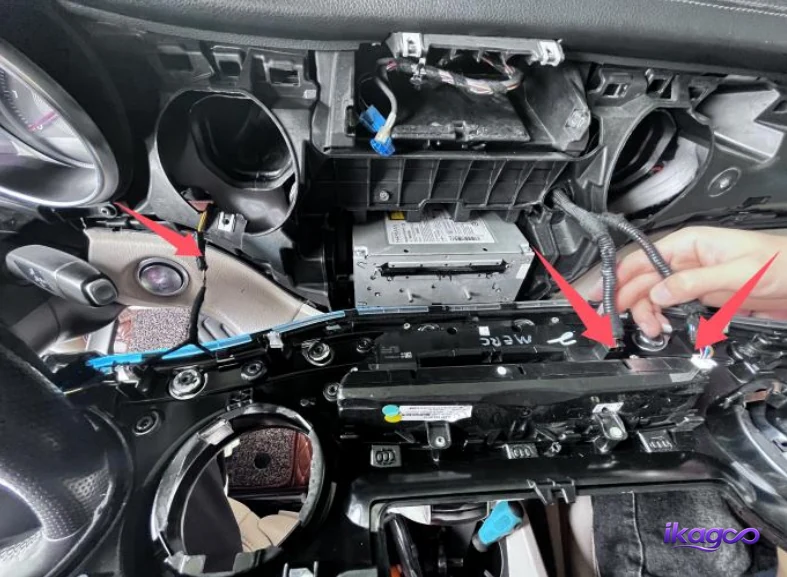
Disconnect the central control-panel connector
Locate the connector lock on the rear of the removed control panel and release it before separating the plug. Pull on the connector body rather than individual wires.
Once disconnected, place the control panel somewhere protected so it cannot scratch or damage other trim.
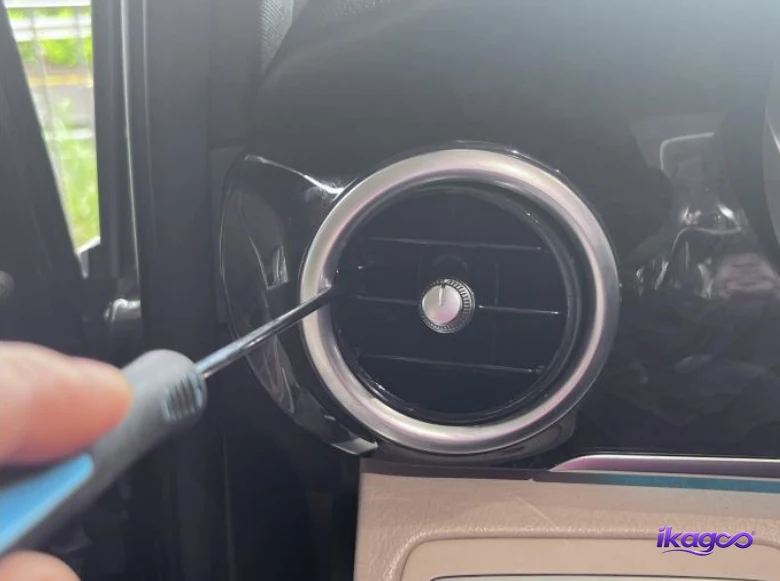
Remove the driver-side air vent
Release the circular vent on the driver's side of the dashboard. This opens the fixing area that continues toward the instrument-cluster trim.
Work around the vent perimeter in small movements rather than trying to remove it from one leverage point.
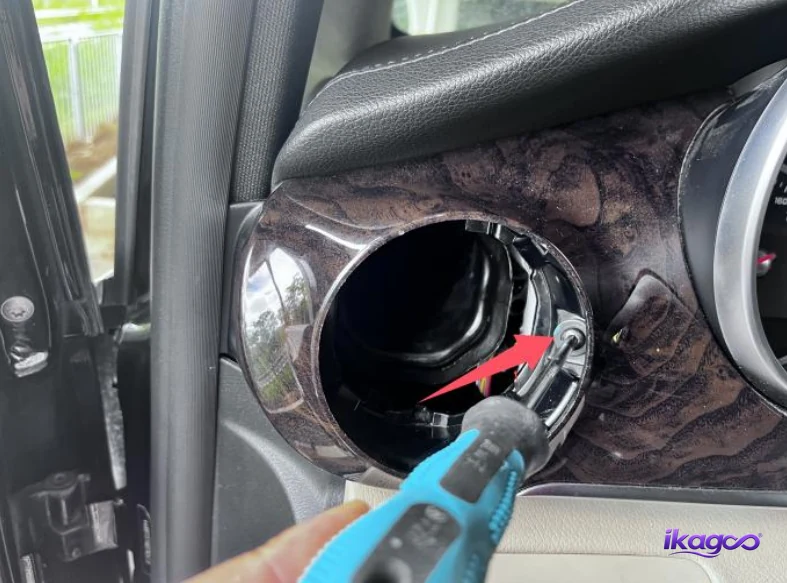
Remove the driver-side vent screw
Remove the fastener behind the driver-side vent. This releases another point holding the dashboard trim around the instrument area.
Keep the driver-side screw identified so it does not become mixed with the cluster or center-screen fasteners.
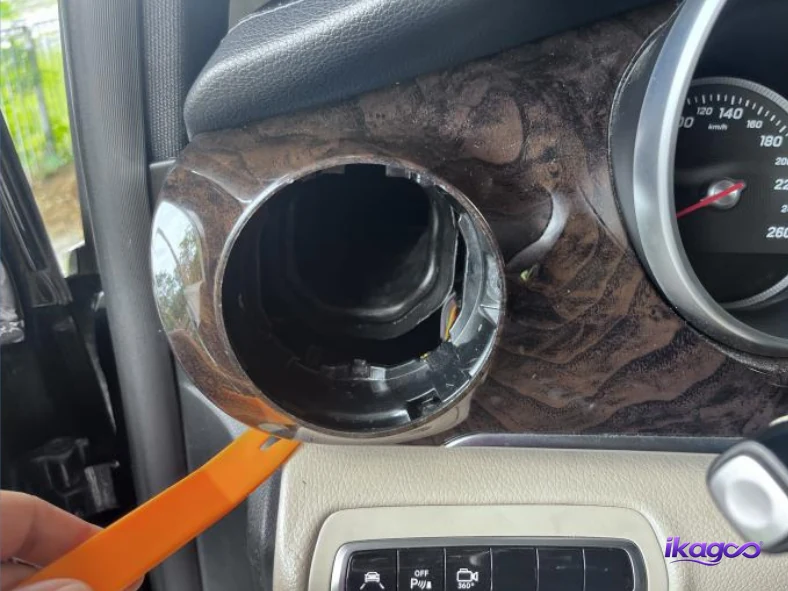
Release the air-conditioning vent panel
Begin separating the longer vent-panel trim from the dashboard using the demonstrated edge. This panel overlaps the structure around the instrument area and must be loosened before the cluster becomes accessible.
Release the trim progressively across its length so one section is not carrying all of the bending load.
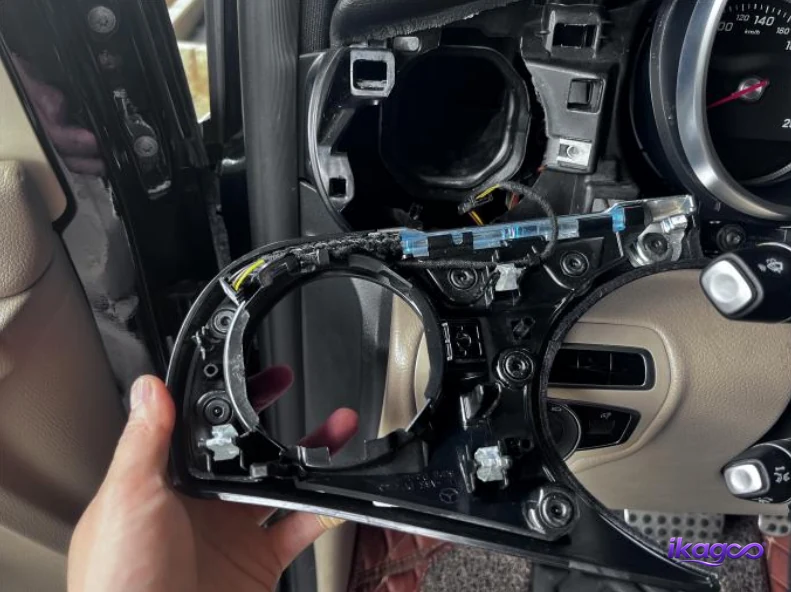
Remove the air-conditioning outlet panel
Lift the loosened vent-panel assembly away from the dashboard. Support the whole section and inspect the back as it comes forward.
Do not move the panel away from the vehicle until you are certain no hidden wiring remains under tension.
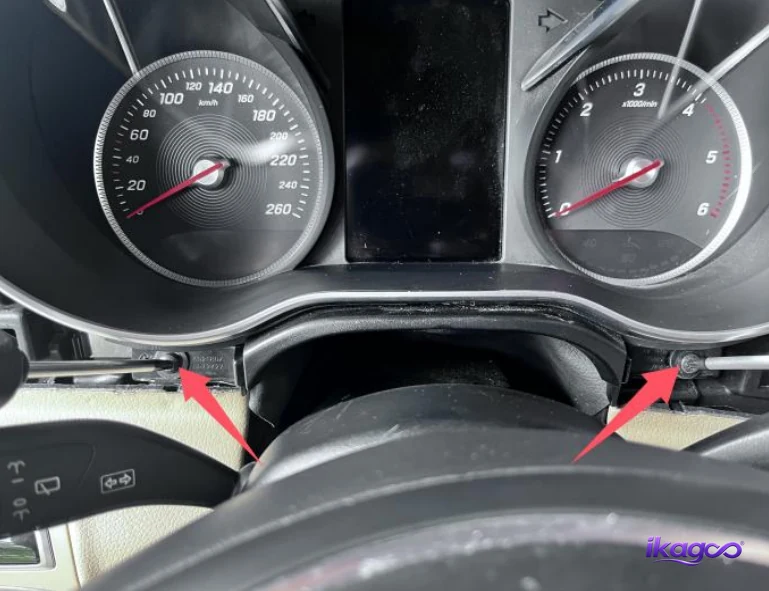
Remove the two dashboard-panel fixing screws
Remove the two fixing points shown around the instrument and steering area. These screws retain the trim that covers the lower cluster mounting section.
After both are removed, gently check whether the panel has the expected movement before proceeding to the steering-column trim.
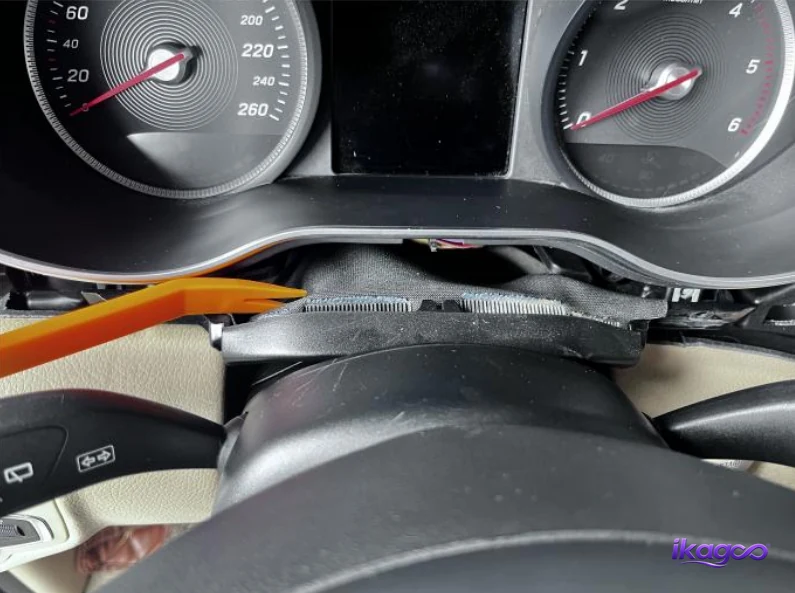
Open the leather-covered trim above the steering wheel
Carefully release the flexible leather-covered trim between the steering column and instrument area. This section hides the lower cluster fixing positions.
Lift it without stretching or folding the material sharply so it can return to the original shape during reassembly.
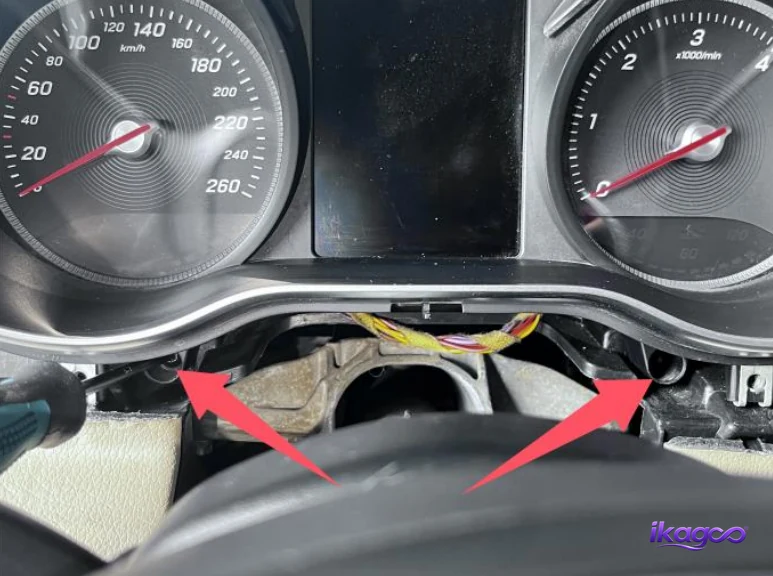
Remove the two original cluster fixing screws
The original instrument cluster is now accessible. Remove the two screws that secure it to the dashboard while supporting the cluster so it does not move unexpectedly.
Make sure both fixing points are completely free before drawing the instrument assembly forward.
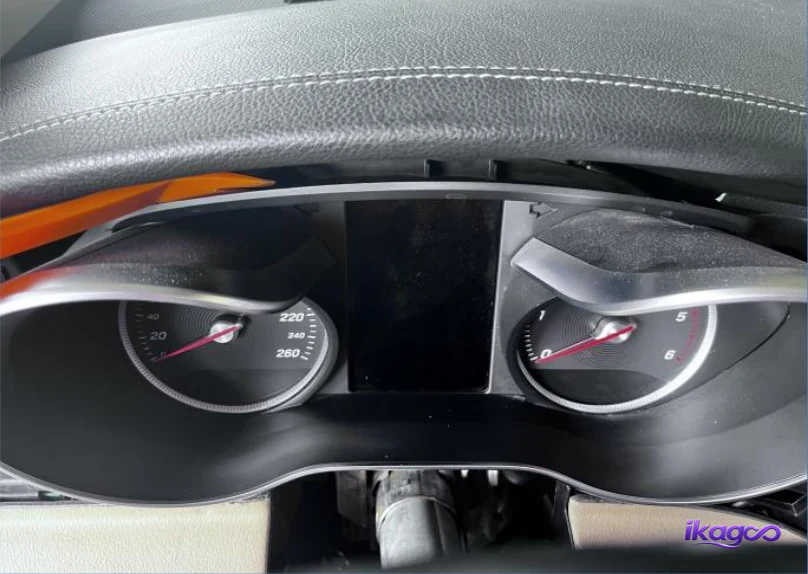
Remove the original instrument cluster
Pull the factory instrument cluster forward from the dashboard opening while supporting it with both hands. Keep the rear connection area visible as the cluster moves out.
Avoid letting the housing scrape the dashboard and do not keep pulling if a harness or connector remains tight.
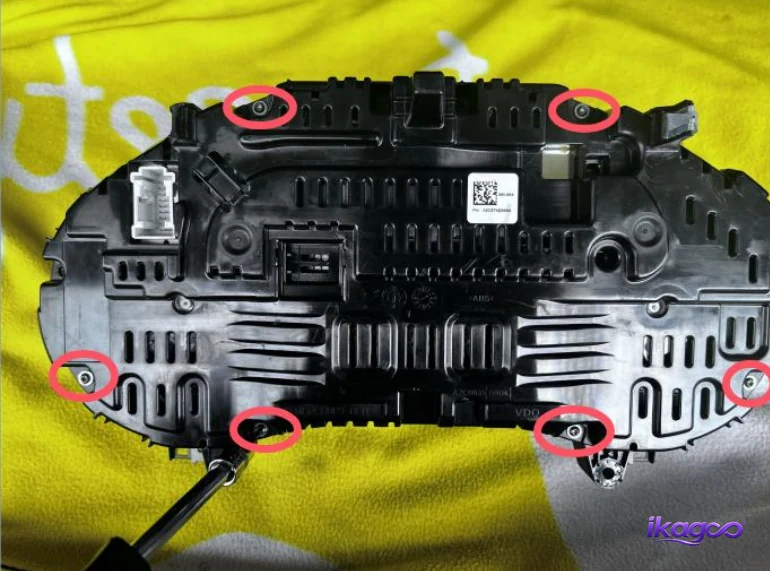
Remove six screws from the original cluster
Place the removed cluster on a protected work surface. The rear photograph identifies six screw positions that must be removed before the original housing can be separated.
Work through all six positions methodically and keep the fasteners together.
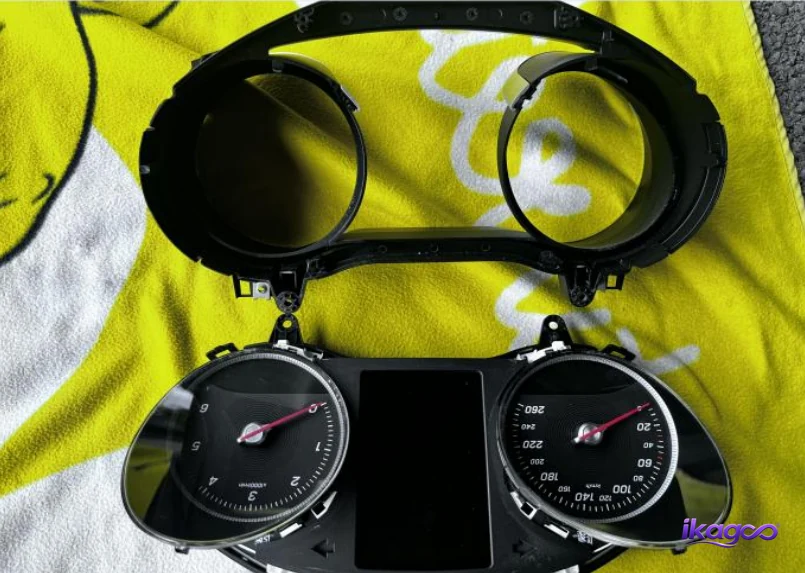
Remove the original cluster mask
Separate the original instrument mask after the six housing screws have been removed. The visible factory mask is no longer needed in the same position because the new LCD assembly uses a different display structure.
Protect the retained original components from impact, dust and unnecessary handling.
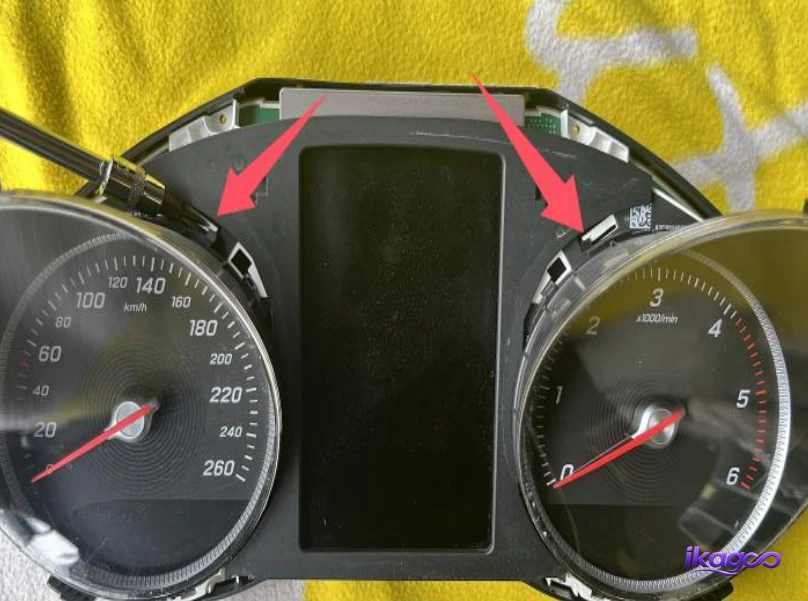
Remove the original cluster bucket cover
Separate the remaining cover around the original instrument assembly. This prepares the retained original unit for the next stage of the LCD conversion.
Follow the housing seams and release the cover without levering directly against internal electronic components.
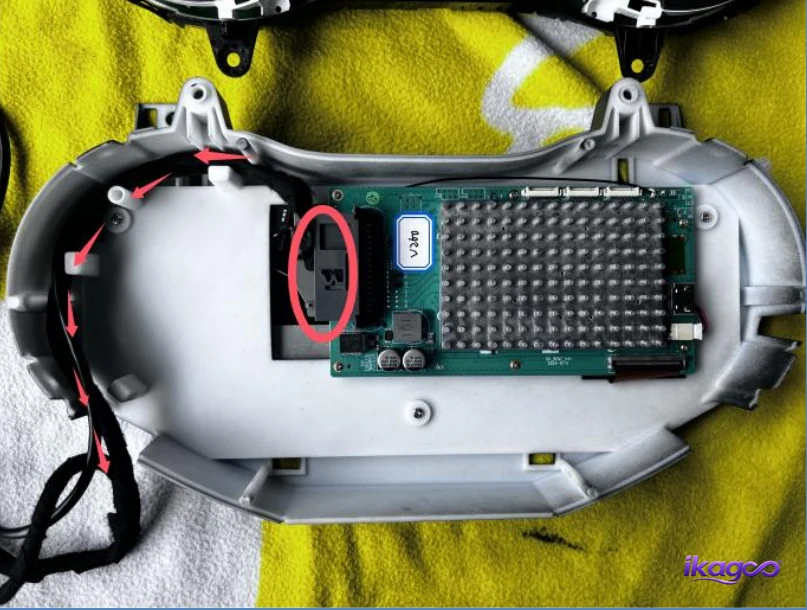
Connect and route the LCD cluster power cable
Connect the documented power-cord plug and route the cable toward the slot shown in the installation photograph. The cable needs to be positioned before the two cluster assemblies are closed together.
Keep the harness away from screw bosses, housing edges and any point where it can become trapped.
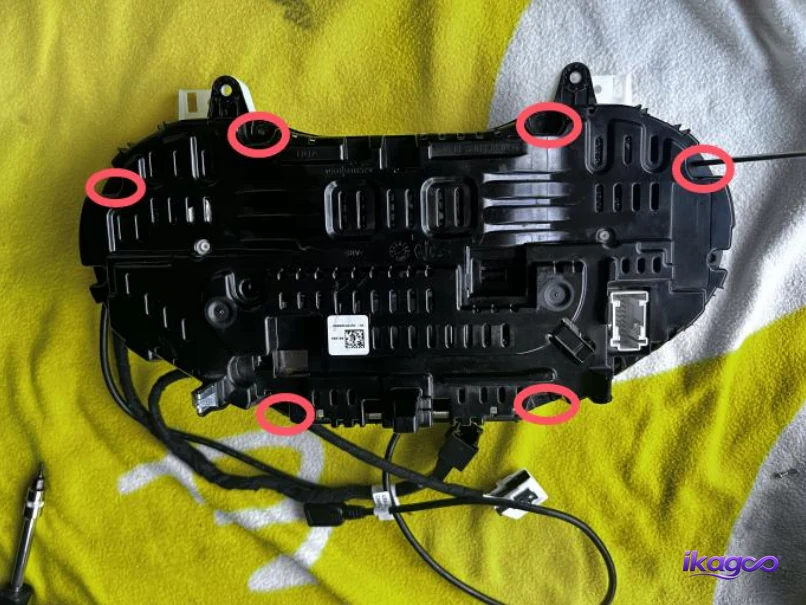
Assemble the retained original unit with the LCD cluster
Align the retained original instrument unit with the new LCD cluster assembly. The installation photograph marks six fixing positions used to secure the combined unit.
Before tightening anything, make sure the housing edges sit evenly and the cable from the previous step is not trapped between the parts.
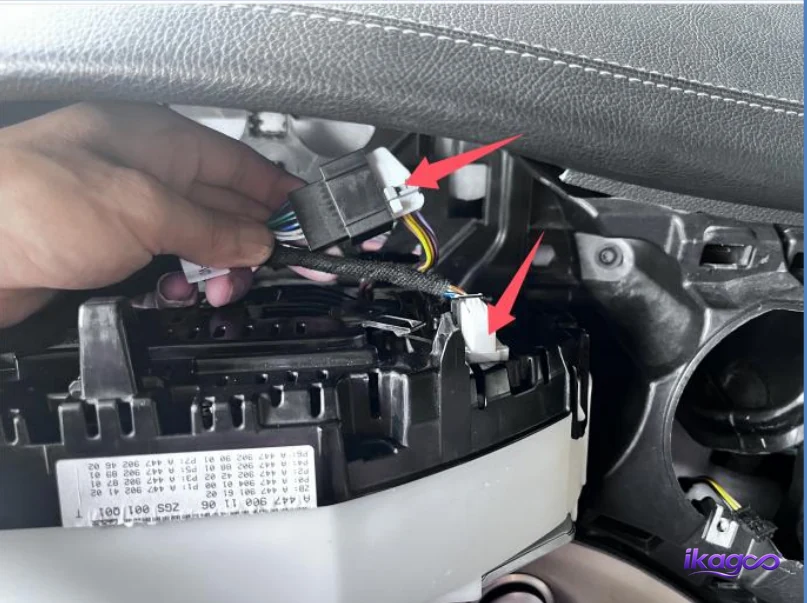
Connect the adapter instrument power cable
Complete the adapter-to-instrument power connection shown in the installation image. Match the connector bodies directly and make sure the locking points are fully engaged.
Route the harness so the assembled cluster can return to the dashboard without the cable being folded sharply or pushed against the housing.
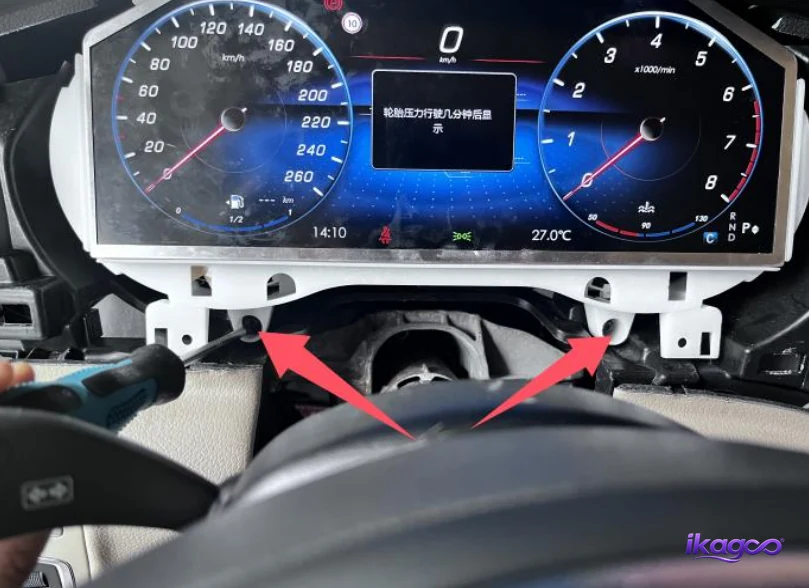
Install and secure the digital cluster
Position the combined cluster assembly back inside the dashboard opening and guide the wiring behind it. The cluster should sit evenly before the two fixing screws are tightened.
Check the gaps around the housing before securing it completely. Wiring trapped behind the cluster can prevent it from sitting flush.
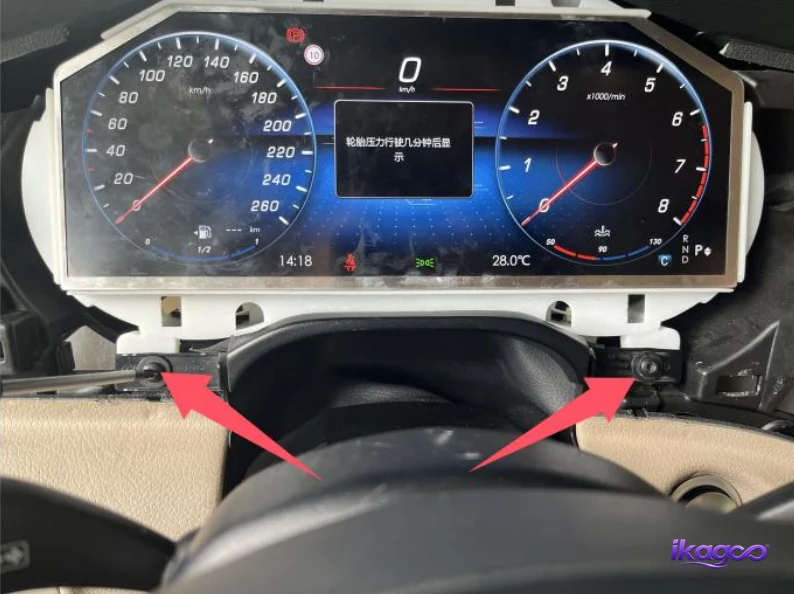
Secure the steering-cover area
Return the steering-column trim to its normal position and secure the two demonstrated fixing points. Align the flexible leather-covered section before tightening the fasteners.
The trim should meet the dashboard and cluster housing evenly without folded edges or excessive gaps.
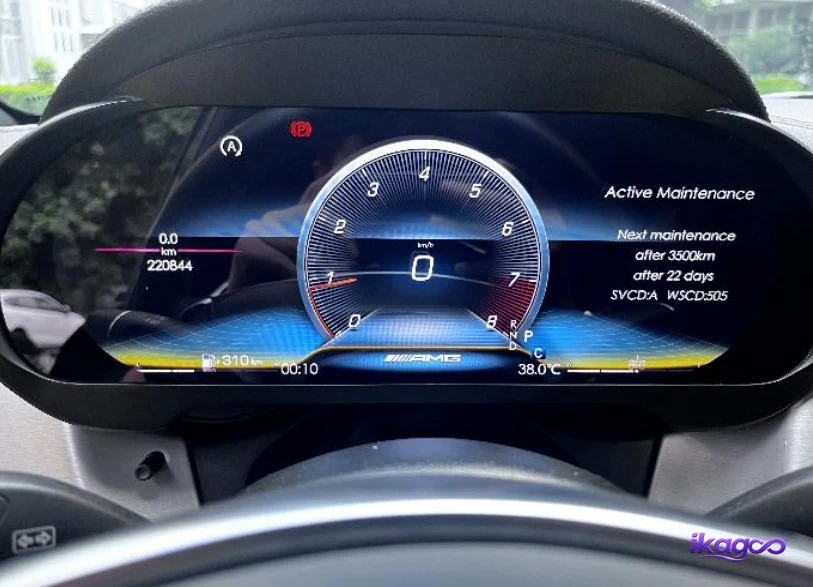
Power on and inspect the completed installation
Power the vehicle on and confirm that the digital cluster starts normally. A powered screen confirms that the physical installation has reached the testing stage, but it does not by itself confirm every supported vehicle function.
Check supported speed, RPM, fuel, gear and warning information, then confirm unit settings and supported CarPlay map-sync behavior before final dashboard closure.
Looking for a Mercedes V-Class W447 digital instrument cluster?

12.3″ Mercedes V-Class W447 Digital Instrument Cluster
If you reached this tutorial while researching a Mercedes W447 instrument cluster upgrade or W447 virtual cockpit retrofit, this is the corresponding iKAGOO product route for selected 2016–2019 V-Class vehicles.
The main upgrade is a 12.3-inch digital driver display with supported original vehicle-data retention, metric/imperial unit switching and CarPlay map sync on the matched product route.
Similar-looking digital clusters can use different hardware, firmware or vehicle interfaces. iKAGOO performs a final vehicle/configuration review before shipment when confirmation is required.
What should you test after Mercedes W447 digital cluster installation?
Do not treat a powered display as the complete acceptance test. Keep the dashboard accessible until supported driving information, connections and physical fit have been checked.
The cluster should power on consistently without repeated restarting, flickering or a blank screen.
Check that supported speed and engine-speed information behaves normally for the matched vehicle.
Confirm supported fuel level, gear position and other retained driving information.
Confirm supported warnings remain understandable and investigate any new abnormal warning after installation.
Select the required MPH/km/h and miles/kilometers display convention and confirm the values are sensible.
On the corresponding iKAGOO product route, test supported CarPlay map-sync behavior before final closure.
Check that each connection used during installation is fully seated and not pulled by the cluster housing.
Confirm the cluster, vents, steering cover and other trim sit level and flush without trapped wiring.
What should you know before buying a Mercedes W447 digital cluster?
Does a Mercedes W447 digital cluster require coding?
There is no safe universal answer for every aftermarket W447 digital cluster. The 27-step installation documented on this page does not show a coding procedure, fixed CAN value or engineering-mode setup. Different hardware can use different installation logic, so follow the instructions for the exact cluster supplied with your order rather than assuming that every W447 cluster is either “no coding” or “coding required.”
Is a Mercedes W447 virtual cockpit the same as a digital instrument cluster?
In aftermarket searches, “Mercedes W447 virtual cockpit,” “digital instrument cluster,” “digital dashboard” and “virtual dashboard” are often used for the same general type of driver-display upgrade. The important point is whether the housing, hardware and vehicle interface match the specific W447 configuration.
Will the Mercedes W447 digital cluster retain original vehicle data?
The corresponding iKAGOO W447 product route is designed to retain supported original vehicle information. Exact displayed functions can depend on the vehicle configuration and supplied version, so supported speed, RPM, fuel, gear and warning information should be checked before the dashboard is finally closed.
Can a W447 digital cluster display CarPlay navigation?
The corresponding iKAGOO W447 digital instrument cluster supports CarPlay map sync on the matched product route. This brings supported navigation content into the driver-display environment rather than requiring the driver to rely only on the center screen.
Will this fit a Mercedes V220d or V250d W447?
V220d and V250d are important European W447 model routes within the current product search range. Compatibility should still be checked from the actual year, dashboard and original instrument cluster rather than relying only on the V220d or V250d badge.
Does this installation guide also confirm Mercedes Vito or Metris compatibility?
No. The installation evidence used for this tutorial specifically identifies a Mercedes-Benz V-Class W447. Sharing the W447 platform does not independently prove that the same digital cluster version, connector arrangement or installation route applies to every Vito or Metris.
Can I change MPH to km/h or miles to kilometers?
The corresponding iKAGOO W447 digital cluster route supports metric and imperial unit switching. Select the correct unit convention for your market and verify the displayed values during the post-installation test.
When should I test the W447 digital instrument cluster?
Test the cluster after the required connections and mechanical mounting are complete but before every dashboard panel is fully closed. This keeps wiring and connectors accessible if a supported function needs to be checked.
What if the supplied W447 cluster connector does not fit?
Stop the installation. Do not force, cut or repin the connection based on another seller's product. Photograph the original connector, supplied adapter and original cluster and have the exact hardware version checked first.
Is a Mercedes W447 digital cluster retrofit worth it?
It is most relevant for owners who want to modernize the display directly in front of the driver rather than only replacing the center infotainment screen. The matched iKAGOO route combines a 12.3-inch digital driver display with supported vehicle-data retention, metric/imperial switching and CarPlay map sync.
What is the difference between a W447 digital dashboard upgrade and an Android center screen?
A W447 digital instrument cluster or virtual cockpit upgrades the driver's gauge and vehicle-information area. An Android center-screen upgrade focuses mainly on multimedia, apps, CarPlay, Android Auto and center-console functions. They address different parts of the cockpit.
Where can I buy the Mercedes W447 digital instrument cluster shown in this guide?
The corresponding 2016–2019 Mercedes-Benz V-Class W447 digital instrument cluster is available from iKAGOO. Use the product link below to view the current configuration and price. Keep your order number because version-specific installation, settings and after-sales support remain connected to the supplied hardware.
Why does the exact Mercedes W447 digital cluster version matter?
Two W447 virtual cockpit products can look nearly identical in photos while using different internal hardware, firmware or vehicle interfaces. Installation photographs are useful for understanding the dashboard removal route, but they do not justify copying unknown firmware, engineering values or CAN settings between unrelated products.
Vehicle-specific matching
Year, dashboard configuration and original instrument-cluster photos are more useful than relying only on the model badge.
Order-linked technical support
Keep the iKAGOO order number so the supplied hardware version can be identified if settings, compatible firmware or troubleshooting are needed.
Third-party hardware boundary
A similar exterior does not prove that another seller's hardware can safely use iKAGOO-specific firmware, configuration or engineering instructions.
Ready to upgrade the W447 driver display?
View the corresponding iKAGOO Mercedes V-Class W447 Digital Instrument Cluster if you want the 12.3-inch digital cockpit shown in this installation route. The current product route focuses on CarPlay map sync, supported original vehicle-data retention and metric/imperial unit switching.
After ordering, keep your order number. If additional vehicle information is required, iKAGOO can complete the final version check before shipment and keep installation and after-sales support tied to the hardware supplied for that order.








Add comment